Under Hood Lighting Done
 05-28-2013, 08:07 AM
#1

Under Hood Lighting - Full Write Up
Edited to include full write-up:
I always seem to be doing work under the hood in the night time. Instead of using drop lights & flashlights, i wired some LED strips under the hood. I wired them to a pin switch, so the lights only come on when the hood opens.
Items needed:
2x 1/4 Meter LED Strips (Or a 1/2 Meter Strip cut in half) $9.99 on ebay or DDMTuning
3M Double Sided Outdoor Permanent Mounting Tape $5.49 for a roll @ Sears/Home Depot
Hood Pin Switch $1.79 on ebay or @ local car alarm/stereo shop
Hood Pin Switch Bracket & 2 Screws $1.99 on ebay or @ loacal car alarm/stereo shop
Power Drill Free-Borrow from someone
5x Female Quick Connect/Disconnect Terminal $2.29 @ Radio Shack
5x Male Quick Connect/Disconnect Terminal $2.29 @ Radio Shack
1x Quick Splice or 1x Ring Terminal (Depends on what power source you will be tapping into) $2.29 @ Radio Shack
6Ft. Black Negative Wire
6-10Ft. Red Positive Wire (Depending on your power source)
Zip Ties
Electrical Tape $0.99 for a roll @ Home Depot/Radio Shack
Scotch Tape $1.99 for a roll @ CVS
Prepping The LED Strips
Step 1:
-Cut two pieces of the double sided tape long enough to fit on the back side of the LED strips. Remove the red backing from ONE side of the tape and attach to the back side of strip. Leave the red backing on the other side intact. Do the same for the 2nd strip
Step 2:
-Attach 2 male quick connects to the end of each wire of the LED strip (+ & -). Do the same for the 2nd strip. (This is being done so if one strip goes bad, you can simply just disconnect it & connect a new one with ease) Or you can put both + wires in one male quick connect & both - wires in another male quick connect. The first way is the better way in my opinion. If you look below, i put both + wires in one male quick connect & both - wires in another male quick disconnect.

Wire Prepping
Step 3:
-Attach a FEMALE quick connect to one end of the 6Ft. black negative wire & one MALE quick connect to the other end.
-Attach a FEMALE quick connect to one end of the 6-10Ft. red positive wire.
Hood Pin Switch Prepping
Step 4:
-You need to measure where you will be bending the hood pin switch bracket. Place bracket against firewall and mark where you need to bend it in order for the pin switch to fit properly. Mark the point with your best estimate while holding it against firewall. To bend, i placed it in a table vice and bent with a monkey wrench. Make sure you bend it from the middle so you get an even bend. If you bend while not holding it in the center, you will get a crooked bend.
Step 5:
-Attach female quick connect to bottom side of pin switch.
Below is a picture of the pin switch in bracket, with the female quick connect attached.

Pin Switch & Bracket Placement
Step 6:
-Attach the bracket to the desired spot against the firewall & screw securely.
-Now screw in the pin sensor into the bracket. Once screwed in, check the height of the pin switch to make sure it clears the hood properly. The hood should push the switch down only slightly.
-The hood pin switch acts as a ground. When the hood is up, the switch is up, completing the grounding connection. When the hood is down, it pushes the switch down, cutting off the grounding connection, which turns the LED's off.
Picture below shows the location i installed it.


LED Placement
Step 7:
-Attach both LED strips under the hood in the cut out of the hood liner. This is done to make sure the strips are placed properly & evenly in the cut out. It is alot harder doing it with the liner off & having to keep repositioning them to fit correctly.
-Use some of the scotch tape to hold the strips in place temporarily.
-Remove the Hood liner. Just simply pry off the many clips holding it in.
-Place Liner aside on a flat surface so it does not get any creases.


Wiring
Step 8:
- Connect the side of the black negative wire with the male quick connect to the female quick connect on the hood pin switch. Now run this wire through the side of the engine bay all the way to the hood. I followed the wire for the windshield fluid.
-Use zip ties to secure the wire to the windshield fluid line on the corner so the wire does not stick through the opening between the fender & the hood.
-Now connect the other end of the black negative wire to the negative wire of the strips.
Pictures of the - wire zip tied to the washer fluid hose:


You can see how i ran the wires behind the hood hinge:
Step 9:
-Connecting the power wire has many options:
A) If you want the light on always when you open your hood, connect to the battery. If doing this method, the end with no connector needs to have a ring terminal to attach to battery terminal.
B) If you want the light on only when the Headlights are on & the hood is open, connect to the headlight wire. Not sure where this is connected. If doing this method, you will need a quick tap connector. (Not a T-Tap)
C) If you want the light on only when the key is in ACC position, connect to the cigarette outlet next to the ashtray. If doing this method, you will need a quick tap connector. (Not a T-Tap)
-Routing this wire from your choice of power source is totally up to you. One tip i can give you is that i unbolted the 2 screws holding the hood to its bracket and slid the power wire between the both and then re-screwed the bolts on. This keeps the wire tucked & out of sight.
-Connect female quick connect from power wire to the male quick connect of the LED strips.
This picture shows how i ran the + wire behind the hood hinge. Remember you have to unbolt both screws, slide wire in, then re-bolt the hinge on:

I ran + wire through firewall, where my alarm & remote start wires go through:

Step 10:
-Replace the hood liner & all clips
-Turn on appropriate power source to check for proper functionality of LED strips.
Step 11:
Stand back and enjoy your handy work!
Light on during the day

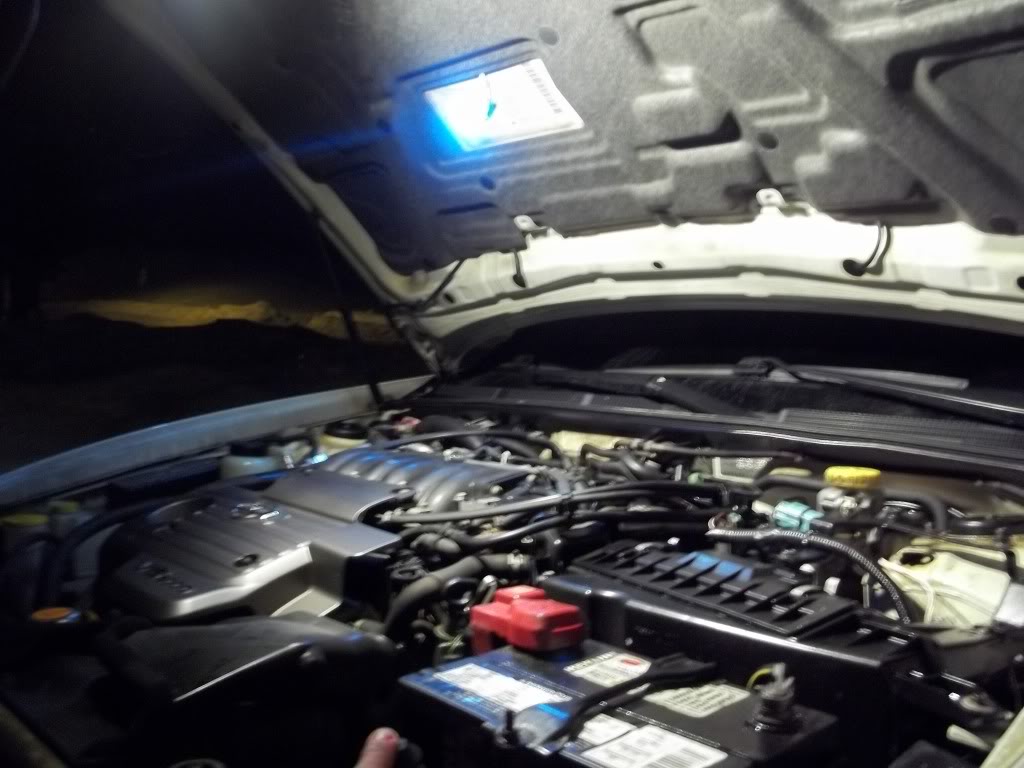
Light on during the night time

Close up of night time shot

This light output is ridiculous! I can see everything @ night with no problems at all. This really makes a difference when i need to go under the hood for a quick fix at night.
REMEMBER TO TAPE BOTH THE POSITIVE & NEGATIVE CONNECTIONS FROM THE LED STRIP AWAY FROM EACH OTHER, UNDERNEATH THE HOOD LINER. IF THEY TOUCH THE STRIP & EVERYTHING CONNECTED TO THAT WIRE WILL NOT WORK.
I wired the strip under the hood lining & zip tied the wires to existing wires in order to make it look like a clean install. I used 3M double sided tape for a more secure attachment to under the hood.
Let me know what you think.
I always seem to be doing work under the hood in the night time. Instead of using drop lights & flashlights, i wired some LED strips under the hood. I wired them to a pin switch, so the lights only come on when the hood opens.
Items needed:
2x 1/4 Meter LED Strips (Or a 1/2 Meter Strip cut in half) $9.99 on ebay or DDMTuning
3M Double Sided Outdoor Permanent Mounting Tape $5.49 for a roll @ Sears/Home Depot
Hood Pin Switch $1.79 on ebay or @ local car alarm/stereo shop
Hood Pin Switch Bracket & 2 Screws $1.99 on ebay or @ loacal car alarm/stereo shop
Power Drill Free-Borrow from someone
5x Female Quick Connect/Disconnect Terminal $2.29 @ Radio Shack
5x Male Quick Connect/Disconnect Terminal $2.29 @ Radio Shack
1x Quick Splice or 1x Ring Terminal (Depends on what power source you will be tapping into) $2.29 @ Radio Shack
6Ft. Black Negative Wire
6-10Ft. Red Positive Wire (Depending on your power source)
Zip Ties
Electrical Tape $0.99 for a roll @ Home Depot/Radio Shack
Scotch Tape $1.99 for a roll @ CVS
Prepping The LED Strips
Step 1:
-Cut two pieces of the double sided tape long enough to fit on the back side of the LED strips. Remove the red backing from ONE side of the tape and attach to the back side of strip. Leave the red backing on the other side intact. Do the same for the 2nd strip
Step 2:
-Attach 2 male quick connects to the end of each wire of the LED strip (+ & -). Do the same for the 2nd strip. (This is being done so if one strip goes bad, you can simply just disconnect it & connect a new one with ease) Or you can put both + wires in one male quick connect & both - wires in another male quick connect. The first way is the better way in my opinion. If you look below, i put both + wires in one male quick connect & both - wires in another male quick disconnect.
Wire Prepping
Step 3:
-Attach a FEMALE quick connect to one end of the 6Ft. black negative wire & one MALE quick connect to the other end.
-Attach a FEMALE quick connect to one end of the 6-10Ft. red positive wire.
Hood Pin Switch Prepping
Step 4:
-You need to measure where you will be bending the hood pin switch bracket. Place bracket against firewall and mark where you need to bend it in order for the pin switch to fit properly. Mark the point with your best estimate while holding it against firewall. To bend, i placed it in a table vice and bent with a monkey wrench. Make sure you bend it from the middle so you get an even bend. If you bend while not holding it in the center, you will get a crooked bend.
Step 5:
-Attach female quick connect to bottom side of pin switch.
Below is a picture of the pin switch in bracket, with the female quick connect attached.
Pin Switch & Bracket Placement
Step 6:
-Attach the bracket to the desired spot against the firewall & screw securely.
-Now screw in the pin sensor into the bracket. Once screwed in, check the height of the pin switch to make sure it clears the hood properly. The hood should push the switch down only slightly.
-The hood pin switch acts as a ground. When the hood is up, the switch is up, completing the grounding connection. When the hood is down, it pushes the switch down, cutting off the grounding connection, which turns the LED's off.
Picture below shows the location i installed it.
LED Placement
Step 7:
-Attach both LED strips under the hood in the cut out of the hood liner. This is done to make sure the strips are placed properly & evenly in the cut out. It is alot harder doing it with the liner off & having to keep repositioning them to fit correctly.
-Use some of the scotch tape to hold the strips in place temporarily.
-Remove the Hood liner. Just simply pry off the many clips holding it in.
-Place Liner aside on a flat surface so it does not get any creases.
Wiring
Step 8:
- Connect the side of the black negative wire with the male quick connect to the female quick connect on the hood pin switch. Now run this wire through the side of the engine bay all the way to the hood. I followed the wire for the windshield fluid.
-Use zip ties to secure the wire to the windshield fluid line on the corner so the wire does not stick through the opening between the fender & the hood.
-Now connect the other end of the black negative wire to the negative wire of the strips.
Pictures of the - wire zip tied to the washer fluid hose:
You can see how i ran the wires behind the hood hinge:
Step 9:
-Connecting the power wire has many options:
A) If you want the light on always when you open your hood, connect to the battery. If doing this method, the end with no connector needs to have a ring terminal to attach to battery terminal.
B) If you want the light on only when the Headlights are on & the hood is open, connect to the headlight wire. Not sure where this is connected. If doing this method, you will need a quick tap connector. (Not a T-Tap)
C) If you want the light on only when the key is in ACC position, connect to the cigarette outlet next to the ashtray. If doing this method, you will need a quick tap connector. (Not a T-Tap)
-Routing this wire from your choice of power source is totally up to you. One tip i can give you is that i unbolted the 2 screws holding the hood to its bracket and slid the power wire between the both and then re-screwed the bolts on. This keeps the wire tucked & out of sight.
-Connect female quick connect from power wire to the male quick connect of the LED strips.
This picture shows how i ran the + wire behind the hood hinge. Remember you have to unbolt both screws, slide wire in, then re-bolt the hinge on:
I ran + wire through firewall, where my alarm & remote start wires go through:
Step 10:
-Replace the hood liner & all clips
-Turn on appropriate power source to check for proper functionality of LED strips.
Step 11:
Stand back and enjoy your handy work!
Light on during the day
Light on during the night time
Close up of night time shot
This light output is ridiculous! I can see everything @ night with no problems at all. This really makes a difference when i need to go under the hood for a quick fix at night.
REMEMBER TO TAPE BOTH THE POSITIVE & NEGATIVE CONNECTIONS FROM THE LED STRIP AWAY FROM EACH OTHER, UNDERNEATH THE HOOD LINER. IF THEY TOUCH THE STRIP & EVERYTHING CONNECTED TO THAT WIRE WILL NOT WORK.
I wired the strip under the hood lining & zip tied the wires to existing wires in order to make it look like a clean install. I used 3M double sided tape for a more secure attachment to under the hood.
Let me know what you think.
Last edited by The Duke of NY; 05-29-2013 at 08:59 AM.


 05-28-2013, 11:06 AM
#4
I got the pin switch from ebay. It was $8 for 5 including shipping. Heres a link:
http://www.ebay.com/itm/Alarm-Hood-Trunk-Door-Pin-Switch-Viper-Universal-NEW-/120480024835?pt=US_Relays_Sensors&hash=item1c0d2b4903
The LED strip i got from DDMTuning.com. You can get them all over ebay, but when i got them from ebay, they were not pure white. They had a slight blue to it. DDM Tuning is the only place where i found them in pure white. A 1/2 meter strip is all you need. Cut the strip into 2 even 1/4 meter sections and they fit perfectly in the cut out of the hood liner. Or you can try and find them in 1/4 meter lengths.
 05-28-2013, 11:43 AM
#6
The bracket for the pin switch was bought from an alarm/stereo store for about $3. You can find them on ebay also. It does not come bent. It comes straight and you have to bend it yourself to fit your needs. They sell one that is bent but i do not think the top is long enough to clear.

 05-28-2013, 12:56 PM
#9
Not hard at all. I was going to do a full write up, but when i was gauging interest from members earlier in the year, they all basically just shrugged it off & said it's been done plenty of times. I will take more pictures of the all wiring & placement tomorrow (it's raining & dark today) along with a full write up.
05-28-2013, 01:26 PM
#10
Not hard at all. I was going to do a full write up, but when i was gauging interest from members earlier in the year, they all basically just shrugged it off & said it's been done plenty of times. I will take more pictures of the all wiring & placement tomorrow (it's raining & dark today) along with a full write up.


 05-28-2013, 09:41 PM
#12
Why not tap into the alarm trigger/pin switch? Needed a location closer to the LEDs?
Looks nicely done. Switch looks a bit out of place, but I believe it would only for those of us familiar with the car, but props for clean install and making it look professional.
Looks nicely done. Switch looks a bit out of place, but I believe it would only for those of us familiar with the car, but props for clean install and making it look professional.

 05-28-2013, 10:20 PM
#14
Nice!.
Http://m.maxima.org/showthread.php?t=628548
For future reference and if you want to simply use the switch that is already on the car, this has been done a few times by A few members. I did write up on it before I switched to neons.
Http://m.maxima.org/showthread.php?t=628548
For future reference and if you want to simply use the switch that is already on the car, this has been done a few times by A few members. I did write up on it before I switched to neons.
 05-29-2013, 08:31 AM
#16
I was thinking about that, but i wanted that separate, just to avoid any future problems. plus i also did not want to run wire all through the engine bay. This way, all the wires are close to the firewall.
05-29-2013, 09:03 AM
#18


 05-29-2013, 10:48 AM
#21
How to do it without installing any bracket, or extra switch:
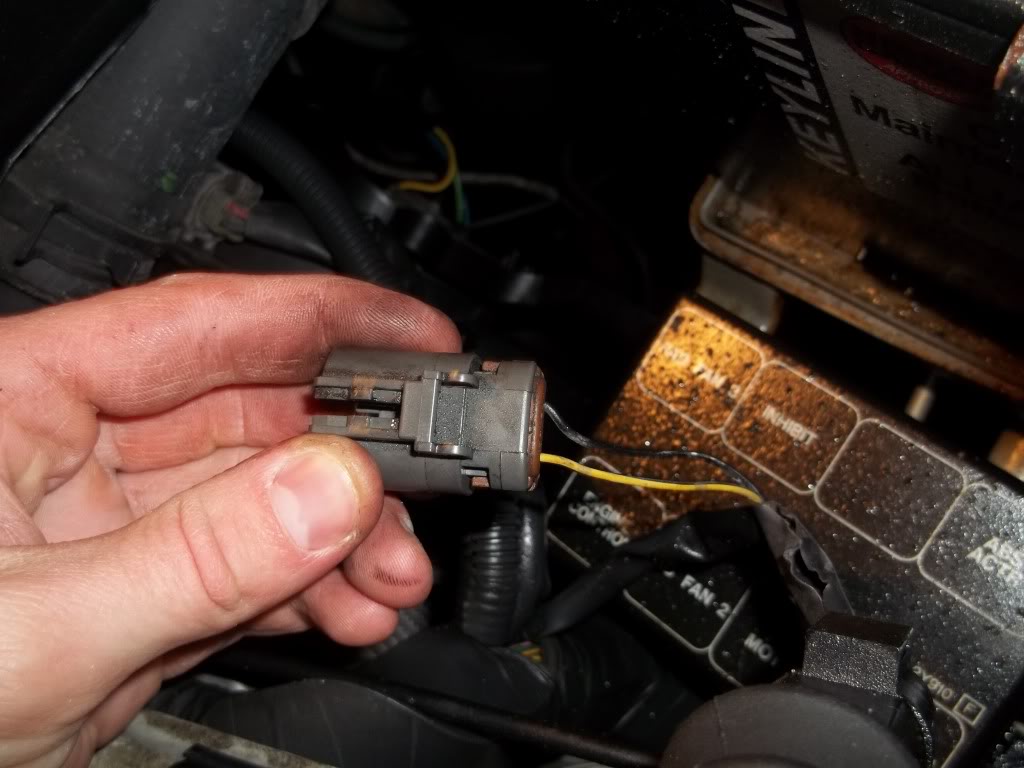
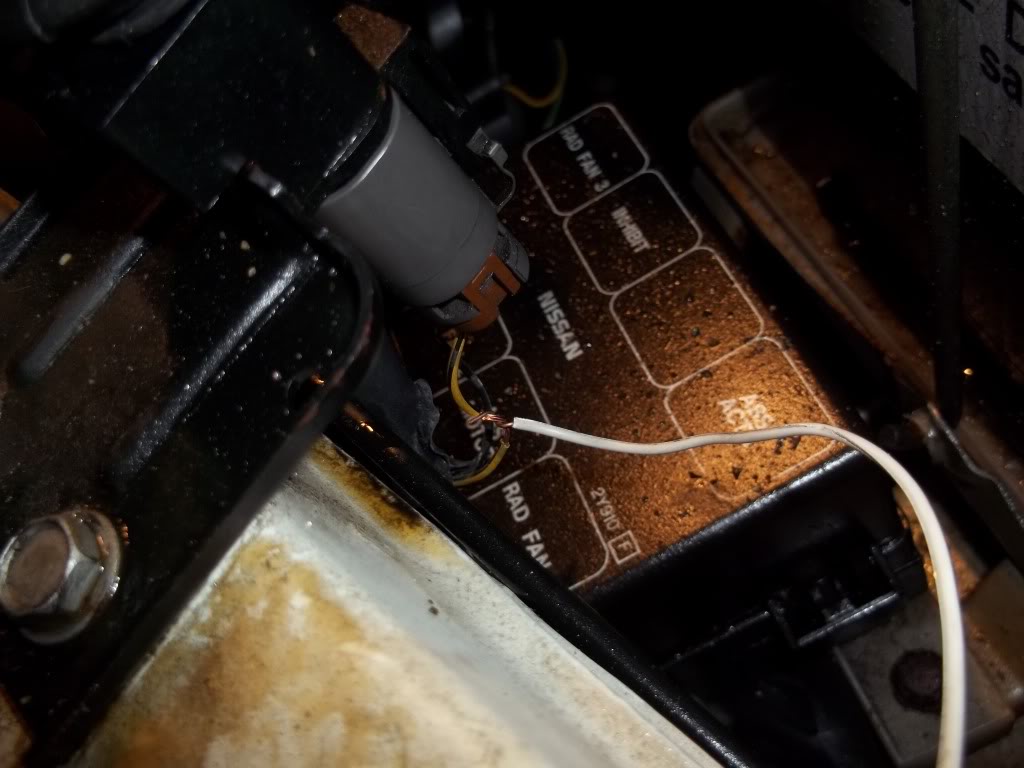
Locate your security system hood switch.
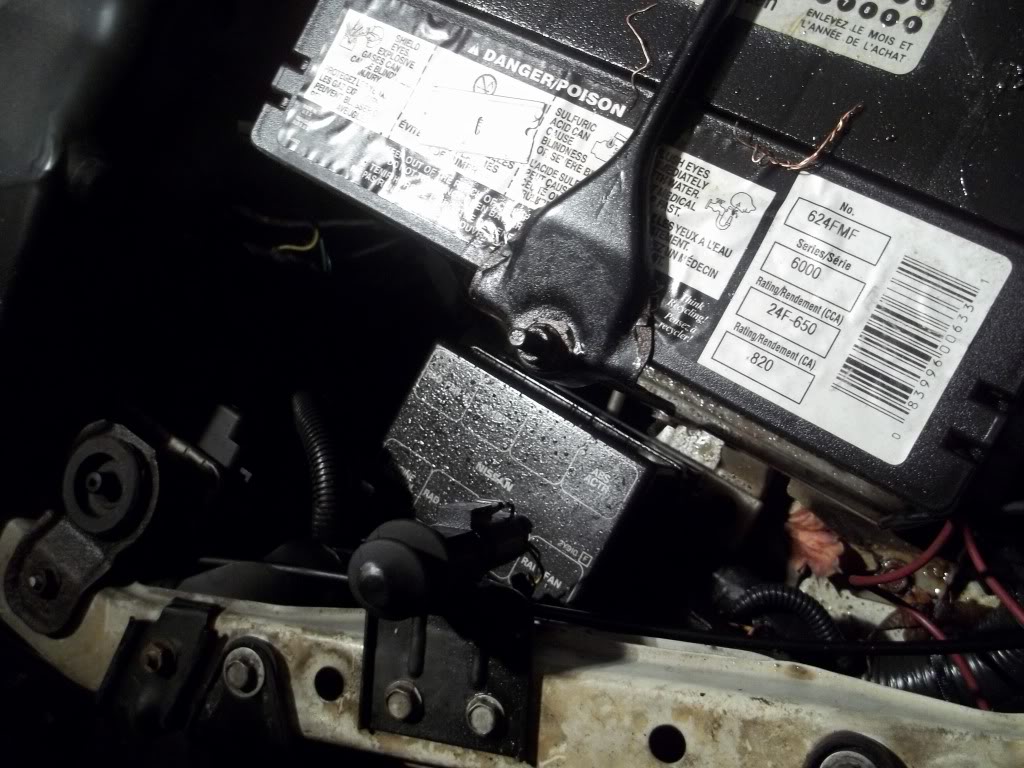
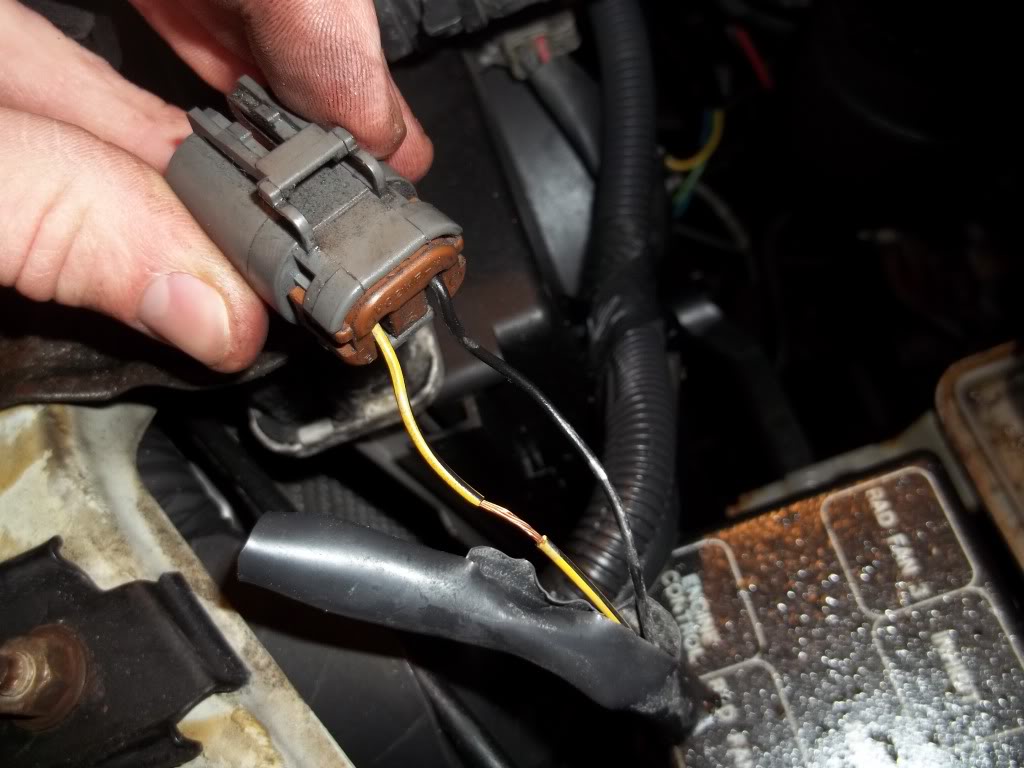
This switch is GROUND triggered. Unplug it, you want to tap into the Security circuit side, that's the yellow wire.
Strip it or cut it, up to you, but you want to tap into this wire.
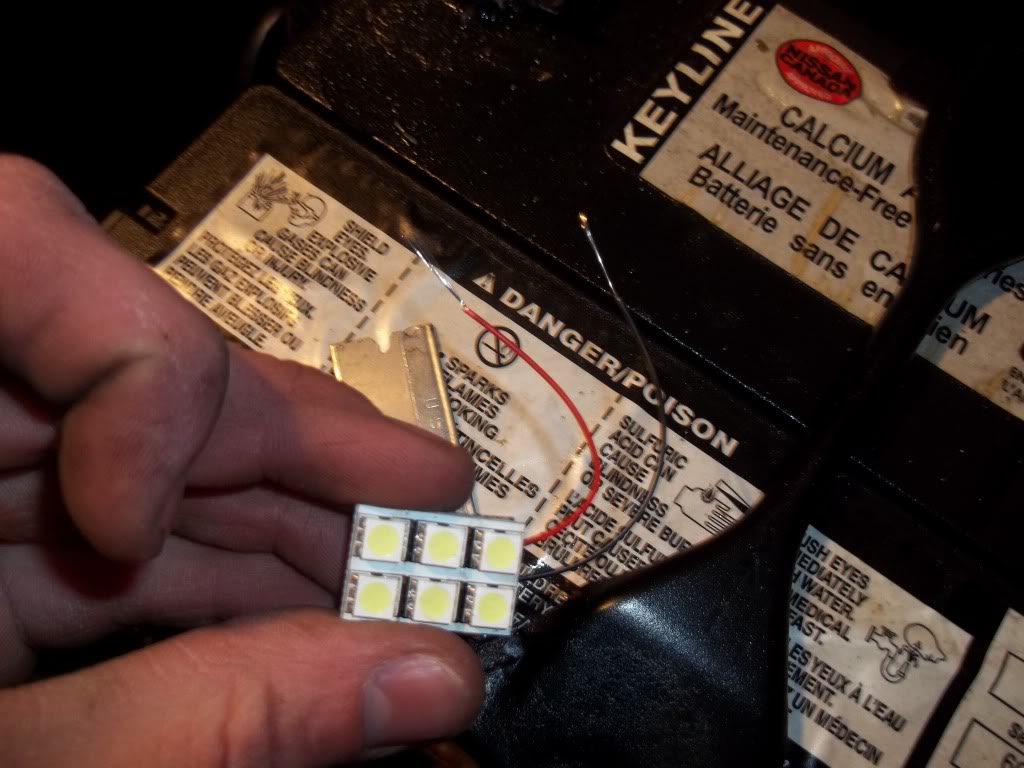
Run your wire, I mounted my LED board next to the A/C tag, you can put multiple lights (I'll definitely add a few later, or change out to incandecent lighting) or put them where ever you want. I'm just showing you where I chose though.
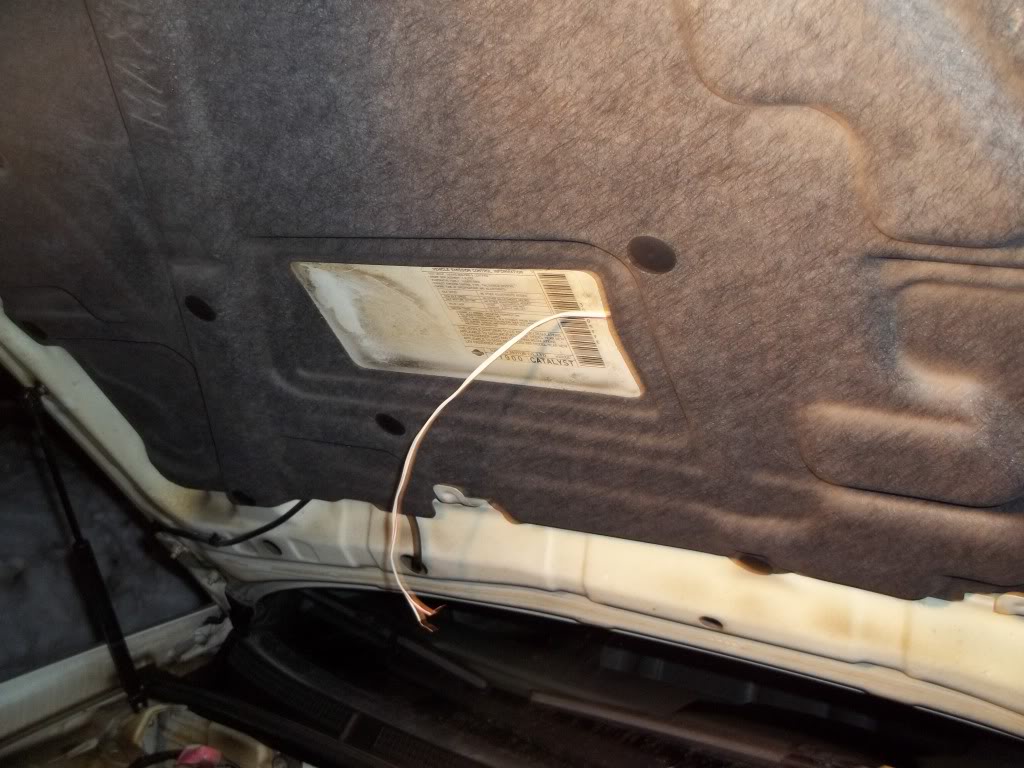
Run it under the hood insulation, over to the hinge and around your strut tower mount, over to the fuse panel next to the battery, and finally to the yellow wire for the hood switch. Do a good job of this or you'll just blow a fuse and have to re-do it anyways. Make sure the wire isn't going to rub anywhere and make sure it's well secured.
Strip back the 2 wire cord, separating the 2 wires from each other. Strip back one wire until it's separated at the fuse panel. I didn't take pics of this, I apologize, you can just bare the wire and install it on the 'out' side of a 10A fuse, or you can do it properly and remove the fuse panel, and solder into the 'out' terminal of a 10A fuse port.
Either way make sure you fuse it, you'll be running live power constantly to the hood light(s), and that wire moves every time the hood opens.
Now hook up the other wire to the yellow wire on the hood switch.
If you have labeled 2 wire (tracer line on one wire) then you can just hook up the LED + to + and - to -. If you're unsure, bare the wires and test them, as soon as it's hooked up correctly the LED's will come on.
Double check that they shut off when the switch is depressed:
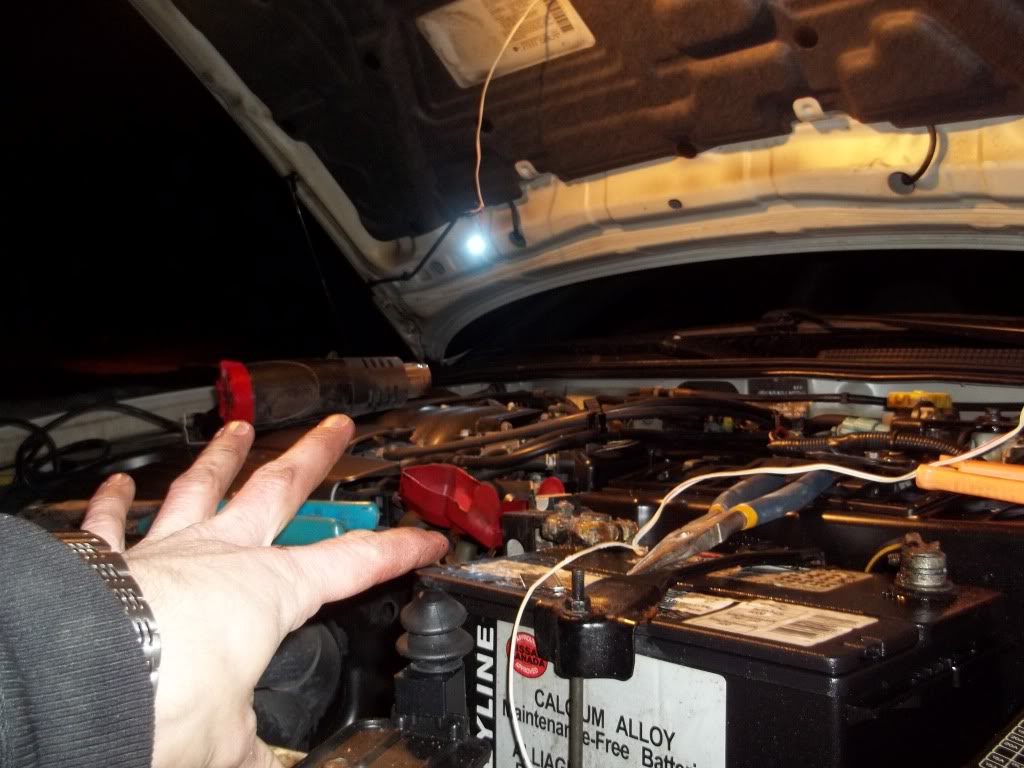
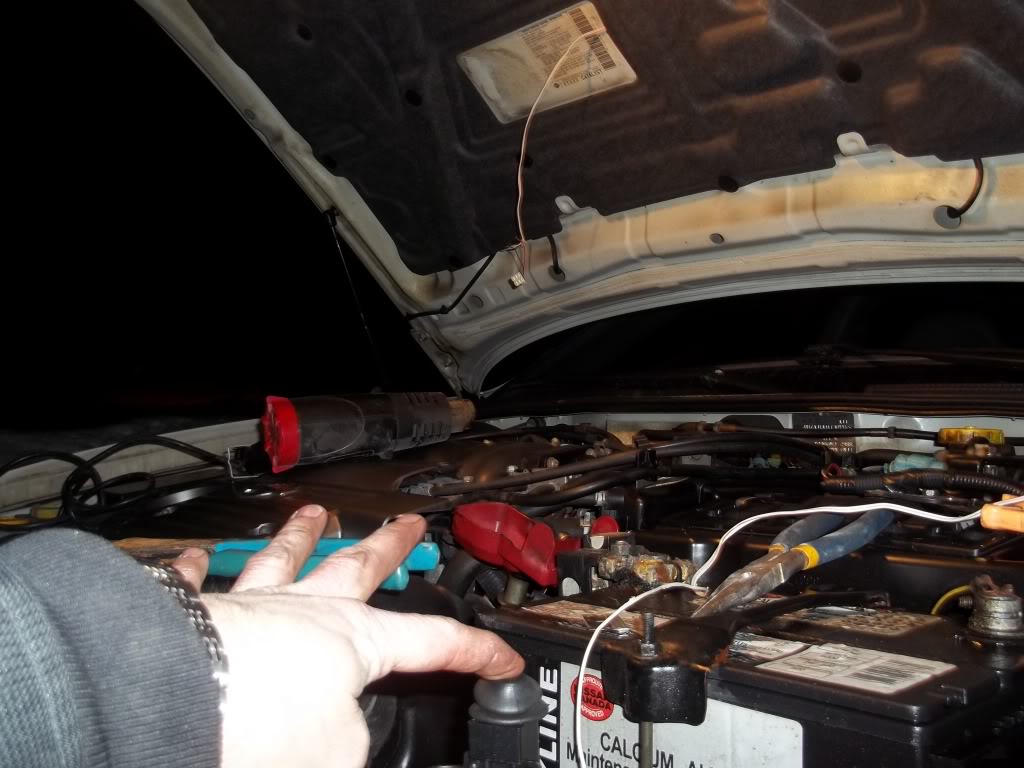
Now secure all wiring, loom, and shrink wrap connections, tidy up and enjoy the light when you open that hood!!
Start to finish this took me about 20mins in the dark. Expect a bit more if you're adding more lights. A Cheap, quick and very usefull upgrade!
And for those of you concerned, NO this will not in any way affect your security system.
Video:
Locate your security system hood switch.
This switch is GROUND triggered. Unplug it, you want to tap into the Security circuit side, that's the yellow wire.
Strip it or cut it, up to you, but you want to tap into this wire.
Run your wire, I mounted my LED board next to the A/C tag, you can put multiple lights (I'll definitely add a few later, or change out to incandecent lighting) or put them where ever you want. I'm just showing you where I chose though.
Run it under the hood insulation, over to the hinge and around your strut tower mount, over to the fuse panel next to the battery, and finally to the yellow wire for the hood switch. Do a good job of this or you'll just blow a fuse and have to re-do it anyways. Make sure the wire isn't going to rub anywhere and make sure it's well secured.
Strip back the 2 wire cord, separating the 2 wires from each other. Strip back one wire until it's separated at the fuse panel. I didn't take pics of this, I apologize, you can just bare the wire and install it on the 'out' side of a 10A fuse, or you can do it properly and remove the fuse panel, and solder into the 'out' terminal of a 10A fuse port.
Either way make sure you fuse it, you'll be running live power constantly to the hood light(s), and that wire moves every time the hood opens.
Now hook up the other wire to the yellow wire on the hood switch.
If you have labeled 2 wire (tracer line on one wire) then you can just hook up the LED + to + and - to -. If you're unsure, bare the wires and test them, as soon as it's hooked up correctly the LED's will come on.
Double check that they shut off when the switch is depressed:
Now secure all wiring, loom, and shrink wrap connections, tidy up and enjoy the light when you open that hood!!
Start to finish this took me about 20mins in the dark. Expect a bit more if you're adding more lights. A Cheap, quick and very usefull upgrade!
And for those of you concerned, NO this will not in any way affect your security system.
Video:


Thread
Thread Starter
Forum
Replies
Last Post
Maxima30
5th Generation Maxima (2000-2003)
2
09-07-2015 06:13 PM
JoshG
4th Generation Maxima (1995-1999)
17
09-05-2015 10:10 PM