View Poll Results: 5th Gen LED mod thread, Yepe or Nepe?
I'd read it, maybe even subscribe to it, but I'd never actually have the balls to do it on my car


15.22%


I've already done it, but would like to contribute my experience and technique to this thread


15.22%
Voters: 46. You may not vote on this poll
How to LED your 5th gen _~ Feeler thread .w. POLL
 02-06-2012, 04:56 PM
#81
Senior Member
Thread Starter
iTrader: (4)
Join Date: Jul 2006
Location: Ontario, Canada
Posts: 5,548
Thanks for posting this dude! But I'm admittedly confused, I've never seen a 5th gen circuit board for the ACC that looks like that. The ACC only has 3 bulbs.... Those things look very impressive though I should pick some up on my next order. Thanks again dude


 02-08-2012, 04:07 AM
#82

Tuner what design do you do for the key ring and the shifter?i'm going to be ordering some things today and what to make sure i pick up all i need.i'm also going to ordering some of that Di-Noc to do my center console because i've been searching forever for a complete OE wood trim kit and have been unable to find one and the dealer has most of it on back order and i refuse to get the stick on crap.i will also be trying out that flexable smd project just for kicks to see how it works out that way if you need to you wont have much trial and error i just wish i could find some smt resistors to use.
02-08-2012, 12:47 PM
#83
Senior Member
Thread Starter
iTrader: (4)
Join Date: Jul 2006
Location: Ontario, Canada
Posts: 5,548
Tuner what design do you do for the key ring and the shifter?i'm going to be ordering some things today and what to make sure i pick up all i need.i'm also going to ordering some of that Di-Noc to do my center console because i've been searching forever for a complete OE wood trim kit and have been unable to find one and the dealer has most of it on back order and i refuse to get the stick on crap.i will also be trying out that flexable smd project just for kicks to see how it works out that way if you need to you wont have much trial and error i just wish i could find some smt resistors to use.
http://thefiberopticstore.com/purcha.../SGS-Fiber.htm
You just shrink tube a bright LED onto the end of the line and It'll illuminate. Then attatch it to the contour of the Key ring somehow (hotglue?)
In the past, the T5 HPx3 bulbs from SBL work ok. Hotspotting is tough to get past though.
For the auto shifter, I made my own bread board and mounted an LED under each indicator. I'd recommend SMD's for this though, I used directional ones and they aren't perfect. SMD's would be great.
02-08-2012, 09:41 PM
#84

the only bulb(s) i didn't replace were the dimmer switch and possibly the hazzard light switch what size did you use for those again? nice work though i went ahead and color matched my whole interior lighting a few months ago during the summer in my downtime at work. great job so far.
02-09-2012, 09:27 AM
#85
the only bulb(s) i didn't replace were the dimmer switch and possibly the hazzard light switch what size did you use for those again? nice work though i went ahead and color matched my whole interior lighting a few months ago during the summer in my downtime at work. great job so far.
A 3mm, 5mm, 8mm or SMD 1210/3528 or 5050 will work in the hazard light switch.
02-09-2012, 09:42 AM
#86
Senior Member
Thread Starter
iTrader: (4)
Join Date: Jul 2006
Location: Ontario, Canada
Posts: 5,548
^Are you going to respond about the Climate control unit? You said you got no hotspots with the 360 degree LED's, did you only put them in stock locations to acheive this, or did you add more than 3?
 [/IMG]
02-09-2012, 05:30 PM
[/IMG]
02-09-2012, 05:30 PM
#88
Senior Member
Thread Starter
iTrader: (4)
Join Date: Jul 2006
Location: Ontario, Canada
Posts: 5,548
Worth a shot, the spread is probably too far apart though. In the future get 1 SMD per CM strips.
Though, for the 2000/2001, they'll probably do just fine, and will be much easier to put in compared to custom boards. You will have tor emove the prism that's in there currently and mount them as low as possible away from the lettering/numbers to prevent hotspots.
Though, for the 2000/2001, they'll probably do just fine, and will be much easier to put in compared to custom boards. You will have tor emove the prism that's in there currently and mount them as low as possible away from the lettering/numbers to prevent hotspots.
02-11-2012, 02:38 PM
#89
Tuner i think i messed something up! i put the cluster back in and the rpm needle is choppy in its movement you know of a fix? or something i may have done.no i didnt drop it this time or bang on it.
Last edited by cjandura; 02-11-2012 at 02:57 PM.
02-11-2012, 02:40 PM
#90
the only bulb(s) i didn't replace were the dimmer switch and possibly the hazzard light switch what size did you use for those again? nice work though i went ahead and color matched my whole interior lighting a few months ago during the summer in my downtime at work. great job so far.
02-11-2012, 02:57 PM
#92
02-11-2012, 03:07 PM
#93
Senior Member
Thread Starter
iTrader: (4)
Join Date: Jul 2006
Location: Ontario, Canada
Posts: 5,548
Looks like it's grabbing a bit. Somehow you must've either tweaked the gauge face, or the needle, and now there's not enough clearance to give the needle free movement. Try popping the black housing off and ensuring the gauge face is fully down against the backing and also in all the allignment notches. Also check for free range of movement when moving the needle by hand. If it touches even once, you know there's an issue with clearance obviously.
Also ensure your plug in's are good at the back of the gauge, no bent pins.
If the gauge face is down and the needle is still rubbing, you'll need to warm up the needle base (black circle in center) a little, and pry it up just a bit. Don't do this until you talk to me though so I can show you how to pre-calibrate just incase the needle comes right off.
02-11-2012, 04:21 PM
#94
Just put the bulbs in the stock locations. No modifications needed.

 02-15-2012, 07:35 AM
#103
Member


Join Date: May 2011
Location: Suffolk, Long Island
Posts: 72
I believe what he means by LED board is like 3x3 LEDs on a small flat panel with adhesive on the back? I believe thats how the ones I just bought from Tyutyunnik are. Tuner please correct me if I am wrong.
02-16-2012, 04:09 PM
#104
Member
Join Date: May 2011
Location: Suffolk, Long Island
Posts: 72
cjandura, did you fix this using any of Tuner's advice?? I noticed I am having the same problem with the RPMs and also the speedometer, and I also did not drop or shake my cluster around to much when putting the LEDs in. If you fixed it, please let me know how.
02-16-2012, 05:03 PM
#106
Member
Join Date: May 2011
Location: Suffolk, Long Island
Posts: 72
oh alright..well tomorrow after work im guna pull mine back apart and make sure all the pins are straight and everything is the way it should be..if theres any good news ill let you know..if not i hope you figure it out to help me lol..
02-16-2012, 07:18 PM
#107
Junior Member

Join Date: Jul 2009
Posts: 31
This is what I put under my shifter and it turned out decent, the (P) and the (1) are a little dim but ok, Tuner I really like every thing youve done here and I'm going to post pics of my interior, but one thing, what type of resistors are you using for the stereo and manual A/C unit? Can you make a detailed list of the LED types and resistors that go along with them?
02-16-2012, 10:11 PM
#109
Senior Member
Thread Starter
iTrader: (4)
Join Date: Jul 2006
Location: Ontario, Canada
Posts: 5,548
This is what I put under my shifter and it turned out decent, the (P) and the (1) are a little dim but ok, Tuner I really like every thing youve done here and I'm going to post pics of my interior, but one thing, what type of resistors are you using for the stereo and manual A/C unit? Can you make a detailed list of the LED types and resistors that go along with them?
I have an aftermarket stereo, but the stock stereo is similar to your window switches, it has SMD's (Surface Mound Diodes), so you actually don't need to install resistors as long as you wire the new SMD's you're installing in the same manner as the stock ones.
02-16-2012, 10:15 PM
#110
Senior Member
Thread Starter
iTrader: (4)
Join Date: Jul 2006
Location: Ontario, Canada
Posts: 5,548
Kind of looks like a burnt red. I really like it.
Red is a VERY hard colour to get just right in LED's, especially to match everything up, looks like you've done a great job, I like the footwell lighting also. Keep up the good work dude!
P.S. Why didn't you install red LED's in your gauges?
Red is a VERY hard colour to get just right in LED's, especially to match everything up, looks like you've done a great job, I like the footwell lighting also. Keep up the good work dude!
P.S. Why didn't you install red LED's in your gauges?
 02-16-2012, 11:04 PM
#113
Senior Member
Thread Starter
iTrader: (4)
Join Date: Jul 2006
Location: Ontario, Canada
Posts: 5,548
How to calibrate your gauges so you can remove needles
*****This post will be edited with pictures and entered into the thread when it cumulates*****
Ok, first, don't complain if this messes your gauges up. I do NOT recommend pulling your needles. I personally have only done it twice, the first time I had a touch of trouble, the second time I haven't tested yet.
Either way, I'll post the procedure. This procedure works for ANY CAR that i'm aware of, unlike the many posted procedures for calibration on here and other sites, this is a UNIVERSAL way to do it.
You must make sure that your fuel level will NOT change during the needle removal, and the car needs to be COLD during removal and install (engine temp).
Here we go.
1. Remove your gauge cluster
2. Remove the stops on your gauge face. These are the little points that the needles rest on when you shut the car off. I don't THINK removing the Temp gauge is necessary but I do it. The fuel gauge isn't necessary.
These things usually clip in with 2 tapered 'ears' that spread out once they are installed. You need to get in behind somehow with needlenose pliers, flat head, or tweezers, whatever, and GENTLY release them.
A trick: FOLDING SOME PACKING TAPE OR EQUIVALENT OVER THE NEEDLES WILL HELP WITH REMOVAL, ALSO, WHEN THESE COME LOOSE THEY TEND TO GO FLYING, SO WITH THE TAPE ON THEM YOU'LL ACTUALLY BE ABLE TO FIND THEM AGAIN WHEN THEY DO!!
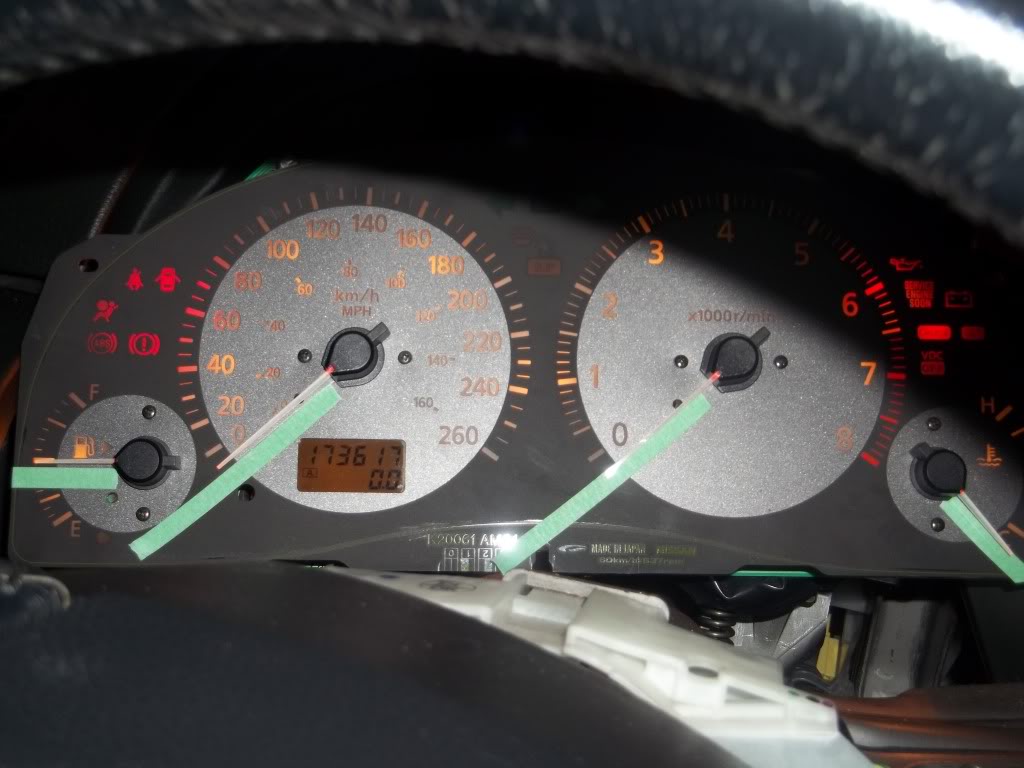
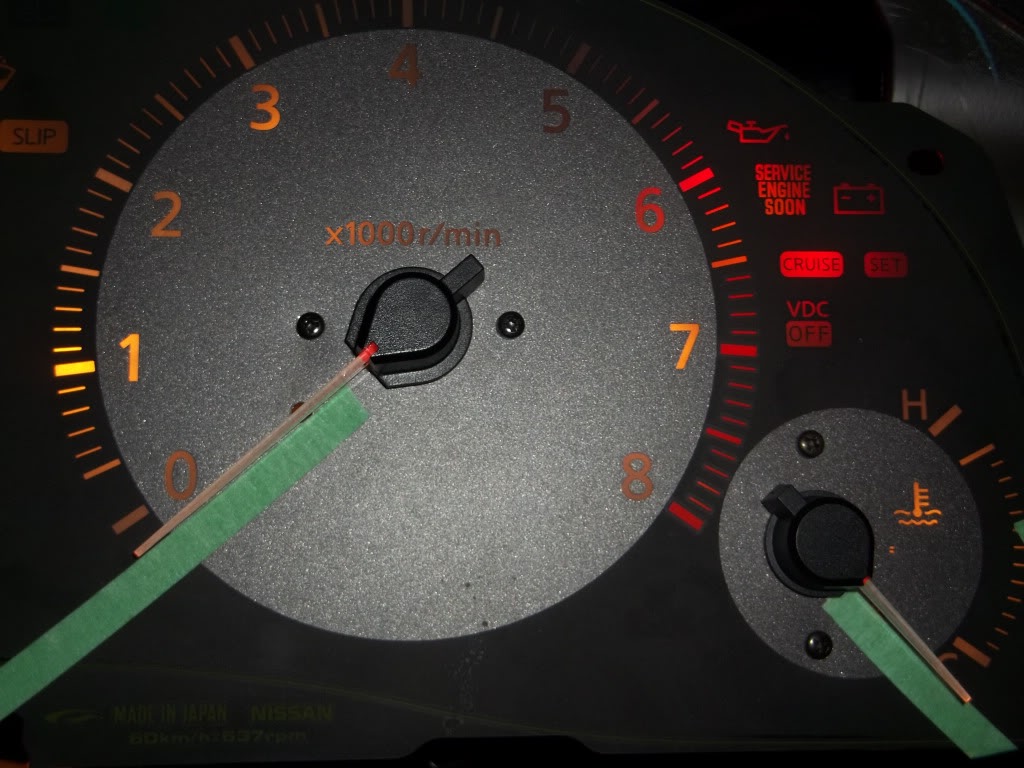
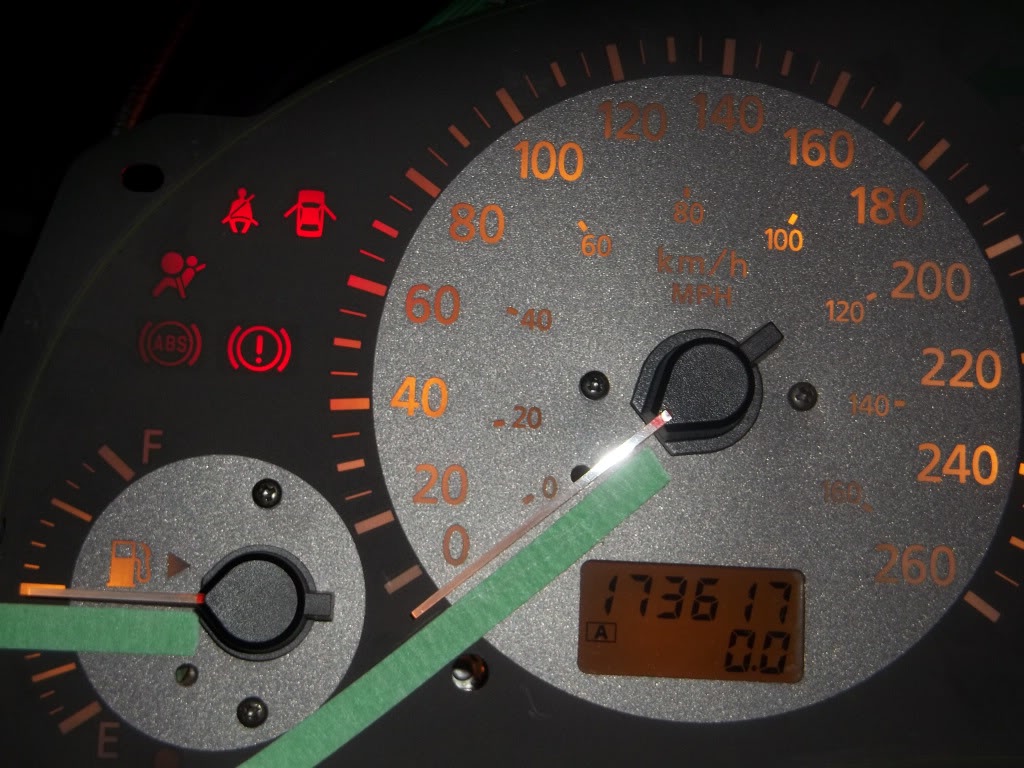
3. Plug your gauges in being careful not to make contact with any exposed circuit boards or grounds. Turn the key to the ON position, and note the needle location. I used 'painters tape', the thin stuff. Works great for this, but anything will work. You can mark it with pencil or marker or whatever, just don't mark anywhere that you'll see once the gauges are fully assembled. I also highly recommend you take a bunch of pictures, like below, for reference later. My tape install wasn't perfect on the speedo (accentuated in pics), but because I have pictures also I'm able to reference them and reinstall precisely the same.

Note: If you're doing this to change your gauge face, be sure to mark the housing, NOT the old gauge faces, or you'll lose your reference completely.
4. Removing needles: TO BE EDITED with pics
Prying using popsicle sticks, putty knife, screwdrivers, etc, just make sure to pry EVENLY all around so you're exerting EVEN force STRAIGHT upwards. Any deviation side to side can/will bend or break the shaft and damage the gauges or needle.
A trick: The needles should come off with relative ease. If it even feels like it's stuck a BIT, grab your heat gun or hair-dryer and warm the needle base up a bit while prying, just be careful not to melt any plastic!!
This heat will help separate the plastic needle base from the steel shaft. I made the mistake of NOT doing this on my Infiniti (most recent needle pulling job), and I pulled the shafts out of the gauges. I'm hoping they'll still be ok, they should be, but this is NOT the proper way to remove them, and I might be into some trouble cause I did.
*****This post will be edited with pictures and entered into the thread when it cumulates*****
Ok, first, don't complain if this messes your gauges up. I do NOT recommend pulling your needles. I personally have only done it twice, the first time I had a touch of trouble, the second time I haven't tested yet.
Either way, I'll post the procedure. This procedure works for ANY CAR that i'm aware of, unlike the many posted procedures for calibration on here and other sites, this is a UNIVERSAL way to do it.
You must make sure that your fuel level will NOT change during the needle removal, and the car needs to be COLD during removal and install (engine temp).
Here we go.
1. Remove your gauge cluster
2. Remove the stops on your gauge face. These are the little points that the needles rest on when you shut the car off. I don't THINK removing the Temp gauge is necessary but I do it. The fuel gauge isn't necessary.
These things usually clip in with 2 tapered 'ears' that spread out once they are installed. You need to get in behind somehow with needlenose pliers, flat head, or tweezers, whatever, and GENTLY release them.
A trick: FOLDING SOME PACKING TAPE OR EQUIVALENT OVER THE NEEDLES WILL HELP WITH REMOVAL, ALSO, WHEN THESE COME LOOSE THEY TEND TO GO FLYING, SO WITH THE TAPE ON THEM YOU'LL ACTUALLY BE ABLE TO FIND THEM AGAIN WHEN THEY DO!!
3. Plug your gauges in being careful not to make contact with any exposed circuit boards or grounds. Turn the key to the ON position, and note the needle location. I used 'painters tape', the thin stuff. Works great for this, but anything will work. You can mark it with pencil or marker or whatever, just don't mark anywhere that you'll see once the gauges are fully assembled. I also highly recommend you take a bunch of pictures, like below, for reference later. My tape install wasn't perfect on the speedo (accentuated in pics), but because I have pictures also I'm able to reference them and reinstall precisely the same.
Note: If you're doing this to change your gauge face, be sure to mark the housing, NOT the old gauge faces, or you'll lose your reference completely.
4. Removing needles: TO BE EDITED with pics
Prying using popsicle sticks, putty knife, screwdrivers, etc, just make sure to pry EVENLY all around so you're exerting EVEN force STRAIGHT upwards. Any deviation side to side can/will bend or break the shaft and damage the gauges or needle.
A trick: The needles should come off with relative ease. If it even feels like it's stuck a BIT, grab your heat gun or hair-dryer and warm the needle base up a bit while prying, just be careful not to melt any plastic!!
This heat will help separate the plastic needle base from the steel shaft. I made the mistake of NOT doing this on my Infiniti (most recent needle pulling job), and I pulled the shafts out of the gauges. I'm hoping they'll still be ok, they should be, but this is NOT the proper way to remove them, and I might be into some trouble cause I did.
*****This post will be edited with pictures and entered into the thread when it cumulates*****
02-17-2012, 03:37 PM
#114
Member
Join Date: May 2011
Location: Suffolk, Long Island
Posts: 72
Looks like it's grabbing a bit. Somehow you must've either tweaked the gauge face, or the needle, and now there's not enough clearance to give the needle free movement. Try popping the black housing off and ensuring the gauge face is fully down against the backing and also in all the allignment notches. Also check for free range of movement when moving the needle by hand. If it touches even once, you know there's an issue with clearance obviously.
Also ensure your plug in's are good at the back of the gauge, no bent pins.
If the gauge face is down and the needle is still rubbing, you'll need to warm up the needle base (black circle in center) a little, and pry it up just a bit. Don't do this until you talk to me though so I can show you how to pre-calibrate just incase the needle comes right off.
Also ensure your plug in's are good at the back of the gauge, no bent pins.
If the gauge face is down and the needle is still rubbing, you'll need to warm up the needle base (black circle in center) a little, and pry it up just a bit. Don't do this until you talk to me though so I can show you how to pre-calibrate just incase the needle comes right off.
02-17-2012, 04:49 PM
#117
Senior Member
Thread Starter
iTrader: (4)
Join Date: Jul 2006
Location: Ontario, Canada
Posts: 5,548
Post year and production date please, i have no vids at work either so I have to check tonight on ur post dude.
have either of you tried reinstalling the stock bulbs and re-testing, or even removing hte LED's and re-testing?
have either of you tried reinstalling the stock bulbs and re-testing, or even removing hte LED's and re-testing?