Installed sway bar endlinks & outer tie rods today **PICS**
 08-31-2011, 05:35 PM
#1
Member
Thread Starter

Join Date: Dec 2007
Location: USA
Posts: 286
Installed sway bar endlinks & outer tie rods today **PICS**
Woke up this morning and was going to try and install my lower control arm, sway bar endlinks, and outer tie rod ends. Well I was somewhat successful because I got 2 out of 3 done. I couldn't get the lower control arm done because I couldn't get the ball joint nut off without removing the axle. I know it can be done without removing the axle but in my case, the nut was rusted shut and i'm afraid of rounding it with a wrench.
So I ended up doing the tie rod ends and sway bar endlinks. I'm going to get the 36mm axle nut from autozone tomorrow and attempt to install the lower control arm.
Out with the old. The passenger side sway bar endlinks was destroyed. As I remove the nut, I can see SANDS pouring out where the bushing was supposed to be. :O

In with the new.

Both sides are done

New Struts, endlinks, tie rods. I'm ballin out of control!! LOL

So I ended up doing the tie rod ends and sway bar endlinks. I'm going to get the 36mm axle nut from autozone tomorrow and attempt to install the lower control arm.
Out with the old. The passenger side sway bar endlinks was destroyed. As I remove the nut, I can see SANDS pouring out where the bushing was supposed to be. :O
In with the new.
Both sides are done
New Struts, endlinks, tie rods. I'm ballin out of control!! LOL
 08-31-2011, 06:12 PM
#2

Looks good.
I recently replaced the LCAs on my Maxima, the only part that gave me any real trouble was the pivot shaft on the passenger side because the sleeve managed to get mechanically welded to the pivot shaft and it just wouldn't let go.
I recently replaced the LCAs on my Maxima, the only part that gave me any real trouble was the pivot shaft on the passenger side because the sleeve managed to get mechanically welded to the pivot shaft and it just wouldn't let go.
08-31-2011, 06:17 PM
#3

Good work, I saw your other thread about the struts. Seems like your cookin along nicely. Whats your past mechanical experience? I do hope you greased those joints. Beware of the lca. Removing the bar with the 3 27mm bolts can be a pita. A buddy was doin my lca's a good while back and we had to take it to a shop to have them pressed off.
08-31-2011, 06:27 PM
#4

") When I replaced my OEM LCAs last year I had to slide the axles out of the hubs also. After grinding off those pins I used a breaker bar to remove those rusted nuts. An open end wrench never could of done it.
When I replaced my OEM LCAs last year I had to slide the axles out of the hubs also. After grinding off those pins I used a breaker bar to remove those rusted nuts. An open end wrench never could of done it.
 08-31-2011, 06:31 PM
#6
Member
Thread Starter
Join Date: Dec 2007
Location: USA
Posts: 286
Good work, I saw your other thread about the struts. Seems like your cookin along nicely. Whats your past mechanical experience? I do hope you greased those joints. Beware of the lca. Removing the bar with the 3 27mm bolts can be a pita. A buddy was doin my lca's a good while back and we had to take it to a shop to have them pressed off.
 but I'm pretty mechanically incline. I did greased the contact points/joints because I'd think they'll squeak and squeal if you don't.
About your warning on the LCA, I'm replacing the LCA as a whole assembly just like this, I don't think I need to worry about pressing anything in or out (bushing wise).
And according to this video
http://www.youtube.com/watch?v=yTIePKbH3hY
Removing the LCA involve removing the 19mm ball joint nut and (6) 22mm bolts. What's this (3) 27mm bolts you're talking about?
08-31-2011, 06:36 PM
#7
Member
Thread Starter
Join Date: Dec 2007
Location: USA
Posts: 286
I need a cordless impact driver badly
but they're pretty crappy power-wise. The $330 dewalt cordless impact is only rated at 300ft/lbs  08-31-2011, 06:44 PM
#8
Thanks! I'm just a car enthusiasts so I don't have a real professional experience per say but I'm pretty mechanically incline. I did greased the contact points/joints because I'd think they'll squeak and squeal if you don't.
About your warning on the LCA, I'm replacing the LCA as a whole assembly just like this, I don't think I need to worry about pressing anything in or out (bushing wise).
-snip-
And according to this video
http://www.youtube.com/watch?v=yTIePKbH3hY
Removing the LCA involve removing the 19mm ball joint nut and (6) 22mm bolts. What's this (3) 27mm bolts you're talking about?
but I'm pretty mechanically incline. I did greased the contact points/joints because I'd think they'll squeak and squeal if you don't.About your warning on the LCA, I'm replacing the LCA as a whole assembly just like this, I don't think I need to worry about pressing anything in or out (bushing wise).
-snip-
And according to this video
http://www.youtube.com/watch?v=yTIePKbH3hY
Removing the LCA involve removing the 19mm ball joint nut and (6) 22mm bolts. What's this (3) 27mm bolts you're talking about?
I think he means the pivot shafts (2) as those are 27mm nuts (I broke the nuts loose before removing the arms). As stated in my previous post (#2) my passenger side pivot shaft was mechanically welded to the bushing sleeve and was a royal PITA to break the weld and get the sleeve off, of course I managed it with hand tools and some improvisation, and patience... tons of it, as well as a whole lot of heat.

Last edited by BenL; 08-31-2011 at 06:52 PM.
08-31-2011, 06:56 PM
#9
Member
Thread Starter
Join Date: Dec 2007
Location: USA
Posts: 286
I think he means the pivot shafts (2) as those are 27mm nuts (I broke the nuts loose before removing the arms). As stated in my previous post (#2) my passenger side pivot shaft was mechanically welded to the bushing sleeve and was a royal PITA to break the weld and get the sleeve off, of course I managed it with hand tools and some improvisation, and patience... tons of it, as well as a whole lot of heat.
 08-31-2011, 07:10 PM
#10
Yes x2, and the nuts aren't what you have to worry about, it's whether or not the bushing sleeve will let go of the pivot shaft itself (just past the threads as shown in those pictures). I was just glad my driver's side was just rust (simple twist broke the rust loose)... passenger side really sucked because the sleeve came out of the bushing and wouldn't come off the pivot shaft.
Last edited by BenL; 08-31-2011 at 07:48 PM.
08-31-2011, 08:07 PM
#11
Member
Thread Starter
Join Date: Dec 2007
Location: USA
Posts: 286
Yes x2, and the nuts aren't what you have to worry about, it's whether or not the bushing sleeve will let go of the pivot shaft itself (just past the threads as shown in those pictures). I was just glad my driver's side was just rust (simple twist broke the rust loose)... passenger side really sucked because the sleeve came out of the bushing and wouldn't come off the pivot shaft.
 How did you end up getting it off? I think I'm going to soak it with WD-40 and pray to god it's not rusted shut or difficult to remove.
If I do happen to get it off, I'm going to put some anti-seize on the thing before installing it. Hopefully it will prevent it in the future from seizing or rusting/bonding together.
08-31-2011, 08:23 PM
#12
Member

Join Date: Dec 2005
Posts: 292
You are going to love the results when you are done. I just did all the same a couple of weeks ago. Mines darn near like it was when it was new. I guess I got lucky none of my old parts put up much of a fight but I had access to a lift and just about any tool known to man thank's to my little brother. The hardest part was pinching the lock washer on the new inner tie rods. Keep up the good work man.
08-31-2011, 08:37 PM
#13
How did you end up getting it off? I think I'm going to soak it with WD-40 and pray to god it's not rusted shut or difficult to remove.If I do happen to get it off, I'm going to put some anti-seize on the thing before installing it. Hopefully it will prevent it in the future from seizing or rusting/bonding together.
By no means am I recommending doing this if you encounter the same problem, this is simply what I decided to do when I had encountered it after having attempted all other methods available at the time.
Just because the sleeve stuck to the pivot shaft that tightly added about 2 hours to the total time it took me to do that control arm.
Last edited by BenL; 08-31-2011 at 08:46 PM.
08-31-2011, 09:10 PM
#14
Member

Join Date: May 2011
Posts: 160
if you're replacing the lcas what's wrong with rounding the ball joint nut? i went through the same thing and didn't want to buy a ball joint removal tool or pickle fork like what everyone suggests. after soaking it with fluid i tried using a torch/hammering but nothing worked so i tried something different
Originally Posted by Perseus
screw or unscrew the castle nut so that there is a slight gap between the nut and the cv joint. place a chisel, large flat head screw driver, or any other metal wedge in the gap and just start hammering. this basically does the exact same thing as a ball joint tool but in a different area (after all the ball joint tool really is just two metal wedges) this might not be the best thing to do if you're keeping the ball joint, but my castle nut and the threads on the ball joint stud seemed fine
 09-01-2011, 06:43 AM
#16
Member
Thread Starter
Join Date: Dec 2007
Location: USA
Posts: 286
Steering is fine. I just break the locknut loose and didn't move it out of position while installing the new one on. Although, I'm going to get an alignment done after i'm done installing everything.
09-01-2011, 06:50 AM
#17
Member
Join Date: Dec 2005
Posts: 292
Yeah you should align it when you are finished no sense in chewing up your tires after all that work. If you count the rotations of the outer tie rod end when removing you can get close to the same alignment before all the parts swapping. But you are resetting a lot of suspension geometery going from old to new parts. Have them do a four wheel alignment as they should be able to shim the rear struts if necessary to get your whip spot on. The alignment tech should love you long time with all new parts.
 09-01-2011, 07:18 PM
#19
Member
Thread Starter
Join Date: Dec 2007
Location: USA
Posts: 286
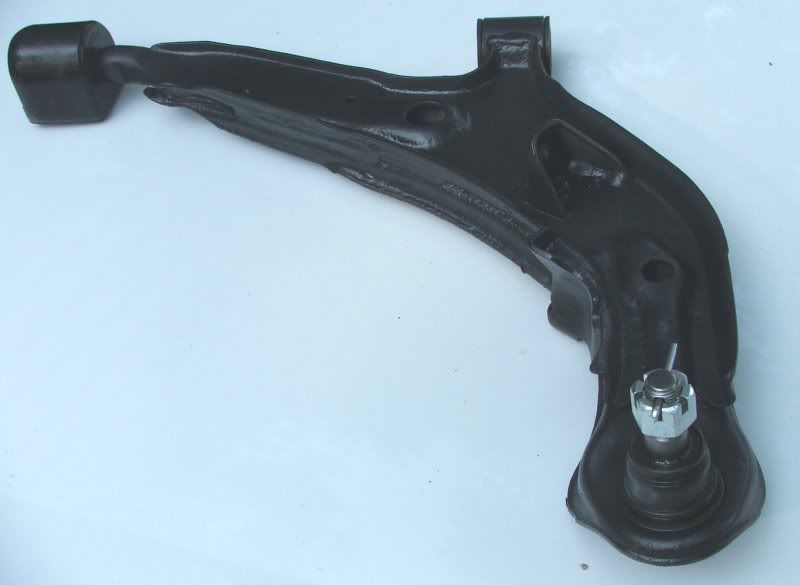
I ordered it through eBay, there's a seller who sell the whole kit for $100 shipped. It includes (2) lower control arm w/bushings & ball joints, 2 inner tie rods, 2 outer tie rods, 2 sway bar endlinks/bushings.
 09-03-2011, 10:52 AM
#21
Member
Thread Starter
Join Date: Dec 2007
Location: USA
Posts: 286
No, mine is perfect. You must have installed it wrong. There are a lot of variables that you must take into consideration. One thing that most people do wrong is installing it facing the wrong direction. If you look at the strut mount, the metal plate will say which side to face the front of the car.
 09-12-2011, 09:37 AM
#23

is this the equivenant of those sway bar endlinks? my driver side is shot and i need replacing too.
http://www.autozone.com/autozone/acc...er=705337_0_0_
http://www.autozone.com/autozone/acc...er=356099_0_0_
http://www.autozone.com/autozone/acc...er=705337_0_0_
http://www.autozone.com/autozone/acc...er=356099_0_0_
09-12-2011, 01:43 PM
#24
Member

Join Date: Oct 2010
Posts: 238
this one is good. remember is use a coupon.
http://shop.advanceautoparts.com/web..._715177050____
http://shop.advanceautoparts.com/web..._715177050____
is this the equivenant of those sway bar endlinks? my driver side is shot and i need replacing too.
http://www.autozone.com/autozone/acc...er=705337_0_0_
http://www.autozone.com/autozone/acc...er=356099_0_0_
http://www.autozone.com/autozone/acc...er=705337_0_0_
http://www.autozone.com/autozone/acc...er=356099_0_0_
12-05-2011, 12:56 PM
#25
Senior Member

Join Date: Sep 2009
Location: Worcester, MA
Posts: 4,011
im looking at these off ebay...
http://www.ebay.com/itm/SET-4-TIE-RO...item1c0ed2bccf
Thoughts?? experience??
And does anyone know where to get boots from. My pass side boot is shot and i cant find any on courtesyparts.com.
http://www.ebay.com/itm/SET-4-TIE-RO...item1c0ed2bccf
Thoughts?? experience??
And does anyone know where to get boots from. My pass side boot is shot and i cant find any on courtesyparts.com.
12-06-2011, 05:17 AM
#26


im looking at these off ebay...
http://www.ebay.com/itm/SET-4-TIE-RO...item1c0ed2bccf
Thoughts?? experience??
And does anyone know where to get boots from. My pass side boot is shot and i cant find any on courtesyparts.com.
http://www.ebay.com/itm/SET-4-TIE-RO...item1c0ed2bccf
Thoughts?? experience??
And does anyone know where to get boots from. My pass side boot is shot and i cant find any on courtesyparts.com.
I don't have any knowledge about those, but personally, I wouldn't use anything other than Moog or OEM for suspension parts. Might cost a little more, but there is no question about quality. Go to Rockauto.com. You can get good prices on parts, and you can find the boots.
12-06-2011, 06:35 AM
#27

When I purchased sway bar end links off ebay 2 years ago I returned them immediately beacuse they were poor quality. They wouldn't even mount evenly. I got the moog sway bar end links, PN K9824, from rockauto for $22 and they were much better.
12-06-2011, 09:38 AM
#29

It took about 2 1/2 hours but it's mostly because I wasn't prepared. I didn't know all the tools needed for this job and was constantly running back and forth to get them. Also jacking up the car, removing the wheels, and using all hand tools in general waste a lot of time
I need a cordless impact driver badly but they're pretty crappy power-wise. The $330 dewalt cordless impact is only rated at 300ft/lbs
I need a cordless impact driver badly
but they're pretty crappy power-wise. The $330 dewalt cordless impact is only rated at 300ft/lbs 
Thread
Thread Starter
Forum
Replies
Last Post
kingw323
4th Generation Maxima (1995-1999)
20
10-21-2015 08:36 AM